Blog -


Integrating Into a Micro Front-End Architecture With React
At FloQast, as we move towards evolving our micro front end, teams were tasked with integrating their existing clients into a hub for all of the front-end clients.

For some teams, their create-react-app client had already been broken out from our main client and needed to be configured so that the build process outputs two bundles:
- To be consumed by the main client
- To be consumed by the client hub
Don’t forget, it also needs to look and feel consistent across all areas of the app!
The challenge?
Your triangle-shaped app needs to fit into two holes:
- A square – Client inside of the main client
- A square inside of a rectangle — Client inside of the main client within client hub
✅ Task #1 – Maintain the Old (while in the testing phase)
Amortization is one of many clients that had already been broken out from the main client and was already fairly independent. Its main dependency is the AutoRec link for each account with Amortization set as the autoRecType. These links exist on two pages in the main client and are the entryway to the Amortization client, which upon clicking loads the client like a component within the main client.
// account.js

{showAutoRecNavLink &&
    <RoleBasedAuthorizationContainer policies={['page-transaction-matching:view']}>
        <AutoRecNavLink companyId={companyId} recId={recId} autoRecType={autoRecType} />
    </RoleBasedAuthorizationContainer>
}
// autoRecNavLink.js

const AutoRecNavLink = ({ recId, companyId, autoRecType }) => {
    if (autoRecType === AUTO_REC_TYPES_HASH.AUTOREC_AMORTIZATION) {
        return <AmortizationNavLink recId={recId} />;
    }
    if (autoRecType === AUTO_REC_TYPES_HASH.AUTOREC_MATCHING) {
        return <MatchingNavLinkContainer companyId={companyId} recId={recId} />;
    }
    return null;
};
// amortizationNavLink.js

const AmortizationNavLink = ({ recId }) => {
    const setReturnUrlAndNavToAmortization = () => {
        window.localStorage.setItem(
            LOCALSTORAGE_AMORTIZATION_BUCKET,
            JSON.stringify({ returnUrl: window.location.pathname })
        );
        browserHistory.push(/amortization/${recId}); }; return ( <div className="AutoRecNavLink"> <a className={'compact-link'} onClick={setReturnUrlAndNavToAmortization}> {'AutoRec'} </a> </div> ); };
We wanted to maintain this bundle while still in the client hub testing phase and used Craco to override the underlying configs for this existing create-react-app client so that current users that are not part of the testing phase see this implementation. Click here for the relevant client injection code.
✅ Task #2 – Transition to the New

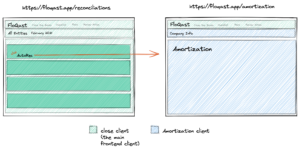
There are a variety of ways to take an existing application and make it work with your company’s new paradigm. Because the AutoRec link is baked into the main client (unlike other parts of the app that have access points in the top main navigation), the Amortization client remains connected to the main client where the link exists. We drafted a handful of potential options for what occurs once the AutoRec link is clicked (as seen in the diagrams):
- Option 1: Amortization client remains a part of the main client and the main client communicates URL path to the client hub
- Option 2: Amortization client is a separate component loaded by the client hub and a new sub-navigation is created that Amortization client is loaded into or below
- Option 3: Amortization client is a separate component loaded by the client hub and Amortization client has its own sub-navigation separate from the main client
Tip: Collaboration is key! Because many teams were involved in transitioning their clients, this created an opportunity to utilize resources– each other!
Ultimately after some guidance about how the client hub is expected to further evolve, we opted for Option 3 where we maintain a similar setup as our main client solution (in Task #1) by ensuring that our integration with the main client is maintained and that the proper information is passed along (we used local storage for data that is not sensitive) so that the app can be integrated within the client hub.
Conditionals such as IS_CLIENT_HUB were used to check whether the user is part of the client hub testing phase, which was also used to render the updated sub-navigation for Option 3. IS_V2 was used as we transitioned users to use the client hub. See the below constants:
export const IS_CLIENT_HUB = get(window, 'FQ.isClientHub', false);
export const IS_V2 = get(window, 'location.pathname', '').startsWith('/v2');
export const BASE_PATHNAME = IS_V2 ? '/v2/amortization' : '/amortization';
In this solution, once the AutoRec link is clicked, Amortization client loads with its own sub-navigation under the client hub main navigation.
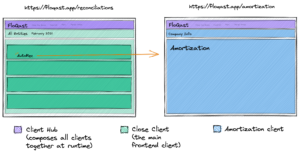
Tip: Diagram it up! (I like to use Excalidraw.) Visuals can relay information more easily and accurately, especially for visual learners! Plus, you can update as you discuss for better documentation on decisions!
What did we learn?
Breaking big problems into smaller problems with smaller solutions can make integrating into a micro frontend architecture relatively painless. This can be done by clearly distinguishing the tasks at all phases of transitioning and working with other teams to discuss approaches to ensure that users are given the illusion of a single application.
Back to Blog

