Blog -


AWS Lambda With NodeJS 101: Creating Your First Lambda
So, you’ve seen the words “AWS lambda” or “serverless” pop up once again in your favorite hacker’s forum, and you’ve decided to venture out and figure out, “just what is a lambda?”
At FloQast, AWS lambdas make up a large part of our back-end architecture. They’ve allowed us to slice our previously entirely monolithic back-end into more manageable, serverless portions. On top of that, our teams have been able to move more quickly, deploy more often, and easily manage the dependencies between different parts of the app as well as the different teams that own them. In this article, we’re going to introduce what lambdas are, what makes them different from other architectures, and show an example of how to create and deploy a lambda.
What Is a Lambda?
A lambda is a cloud-based service that allows you to upload code onto a managed server without having to actually provision or manage the server itself. Unlike traditional hosted servers, the lambda process only runs when the code is invoked by an event, reducing the amount of unused uptime. Additionally, lambdas can typically access any other service that your cloud provider offers, like Amazon and their S3 storage service, or Google and their Dataflow analytics service.
Lambdas are triggered by “events.” These can be events like an upload to an S3 bucket or even something that mirrors a traditional HTTP REST architecture like events from an API Gateway. When you upload a lambda, you also upload the configuration on what events that lambda should be triggered by. When one of those events is fired off by some other service, your lambda will be activated, and run the code that was uploaded in response to the event.
Why Use Lambdas?
Lambdas reduce the amount of non-application-related maintenance that developers have to manage. Instead of having to focus on installing/upgrading operating systems, running security patches, checking package versions, etc., developers only have to focus on the actual application code, reducing the burden of infrastructure. This also means that developers don’t have to install virtual machines or Docker images to try to replicate the production environment locally on their machine, which helps remove a whole host of “works on my machine” issues that inevitably come up.
Additionally, lambdas can auto-scale based on usage. In other words, if your lambda is being invoked many times to the point that your current number of compute instances can’t immediately respond to each invocation, your cloud provider will automatically increase the number of compute instances that run your lambda in response. When the number of invocations falls back down, the number of instances of your lambda will also scale back down. While auto-scaling isn’t unique to lambdas, what is unique is that lambdas are completely spun down when not in use. Contrasted against traditional servers which use billable time for as long as the server is up and running, lambdas can be a more cost-efficient solution for shorter duration workloads.
However, if you need more fine-grained control over the system(s) that your application runs on, you might want to consider managing your own cloud infrastructure (i.e. Amazon EC2, DigitalOcean Droplets, etc.).
Example
Disclaimer: AWS Lambda allows for 1 million free requests per month; anything over that will begin to incur charges. This tutorial should not come close to breaking that tier in itself, but if you have already surpassed your usage limits for the month, then you should be aware that invoking any of the lambdas deployed by the will incur charges.
Now that we’ve covered the basics, let’s take a look at how we can create a lambda. Before continuing, you will need to make an AWS account to follow along.
We’ll make a simple Node.js lambda function that will act as a crystal ball and respond to any yes-or-no question asked!
Setting Up the Lambda
To create a lambda, navigate to the AWS Lambda console and click on “Create Function.”

In the form below, fill in the “Function name” as “crystalBall” and leave everything else as-is. Once you’ve typed in the function name, click the “Create Function” button at the bottom of the page.

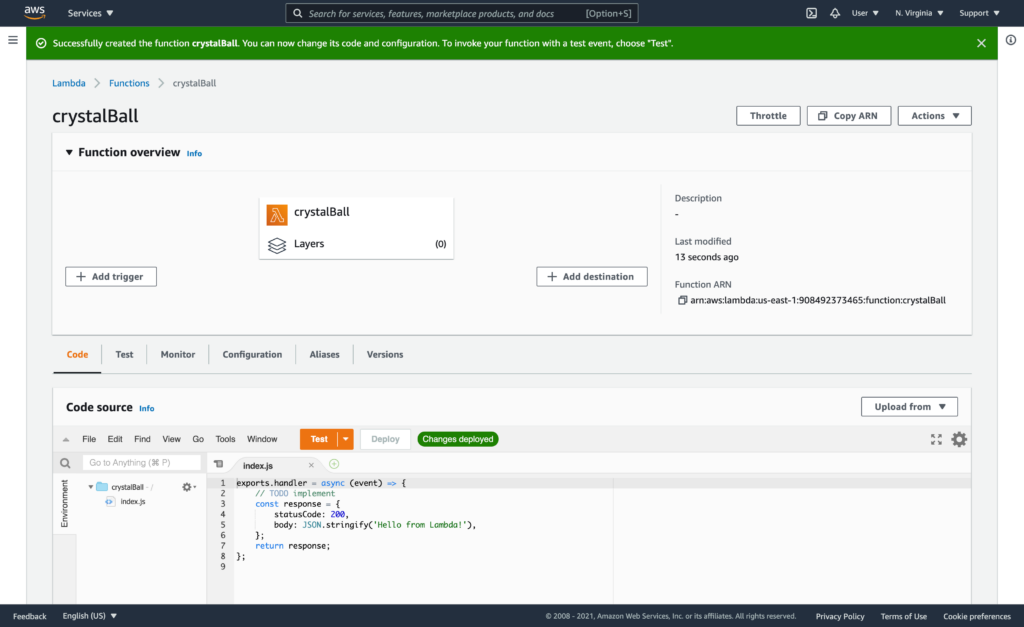
After the page finishes loading, you should be navigated to your new lambda’s management page where you can modify the code that gets executed, configurations, test inputs, and much more.

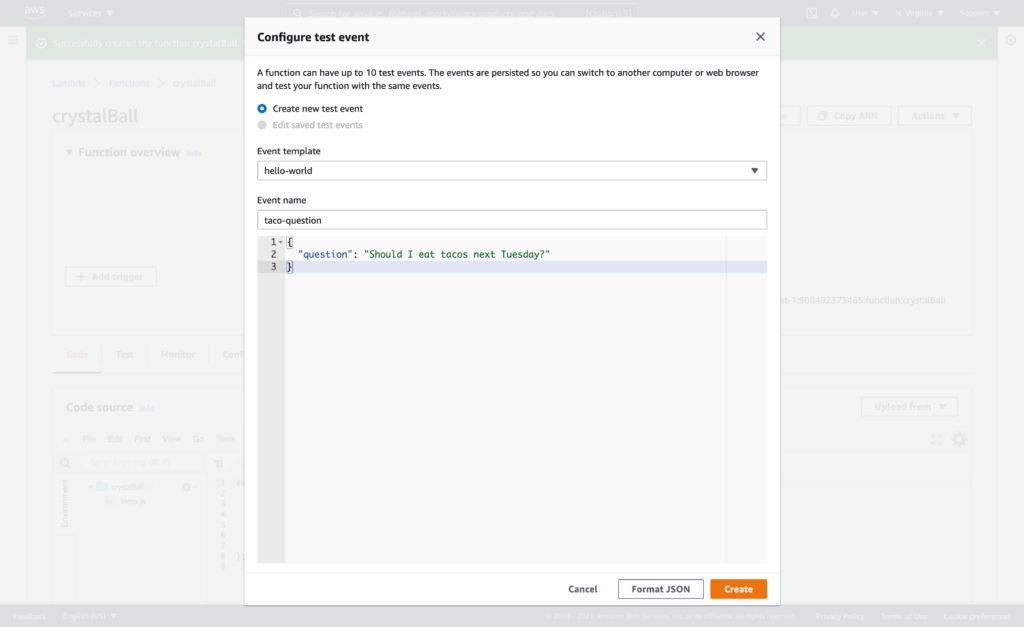
If you notice at the bottom of the page, there is a “Test” button. This button allows us to send a test “event” to our new lambda, which is the same event variable seen in the code editor below. However, before we can send any test data, we need to make a test event. Click on the down arrow next to the “Test” button, and select “Configure Test Event.”
In the pop-up menu, add an event name. Then, in the JSON data textbox, create a test yes-or-no question to send to your “crystal ball” lambda.
When you’ve thought of a question, click on the “Create” button.

Now that we’ve got a test event, we need some code to process that event! If you look in the code editor right now, you’ll notice some boilerplate code that outputs “Hello from Lambda!” If you press the “Test” button, you’ll get an execution result that indeed prints that result. Let’s modify the code to do something more interesting! Replace the code inside of the editor with the following:
exports.handler = async (event) => {
    // Get the "question" from the event JSON
    const { question } = event;

    const crystalBallResponses = [
        "Without a doubt!",
        "Answer hazy; ask again.",
        "Doesn't look promising."
    ];

    // Select a random reply from the array of responses
    const reply = crystalBallResponses[Math.floor(Math.random() * crystalBallResponses.length)];

    const response = {
        statusCode: 200,
        body: JSON.stringify(`You asked "${question}". The crystal ball shows you the answer to your question: ${reply}`),
    };
    return response;
};
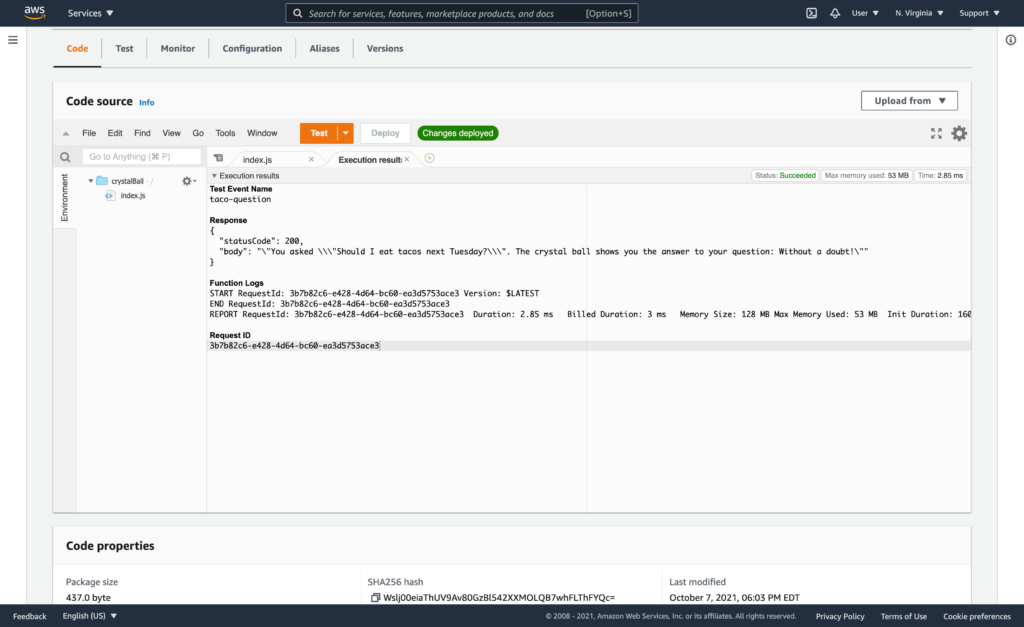
Now, try running the test again. You should get a result like the image seen below:

Congratulations, you just wrote and deployed your first lambda!
Teardown
To tear down the lambda, navigate back to the “Functions” page and click the checkbox next to your lambda function. Then, click on the “Actions” dropdown and select “Delete.” In the confirmation pop-up that follows, confirm the delete by clicking “Delete” once more.
Conclusion
In this article, we presented some fundamentals of lambdas and how to deploy a lambda function. A lot of features were hidden by the UI setup flow, but that’s kind of the point of lambdas! We don’t need to necessarily be concerned with how to provision servers, manage those servers, or package our code to push up to those servers.
In the example above, we deployed a lambda that responds to a question with data that was passed in as an event. More features could be added onto this lambda, such as adding a database, adding file storage/retrieval, or even chaining multiple lambdas together to create complex data processing pipelines.
At FloQast, we use internal tools to deploy our lambdas in an automated way that allows us to create and test lambdas even more quickly. On a daily basis, we modify our lambda code, invoke our lambdas locally to test without having to deploy, and then deploy our lambdas via our CI/CD pipelines, which involve automated tests, provisioning as necessary, and deployments.
If the idea of serverless architecture sounds interesting to you, we are currently hiring!
Back to Blog
